Key Takeaways
-
Automating your greenhouse can significantly increase plant health and growth by providing optimal conditions.
-
A Raspberry Pi can be used as the central control unit for monitoring and adjusting greenhouse conditions.
-
Essential components include sensors for temperature, humidity, soil moisture, and light, as well as actuators for controlling fans, pumps, and lights.
-
Setting up the system involves both hardware assembly and software programming, which can be done using Python.
-
Monitoring can be done remotely, allowing you to access real-time data and control your greenhouse from anywhere.
DIY Automated Greenhouse Monitoring With Raspberry Pi Grow Room Controller
Build Your Own Smart Greenhouse
Imagine walking into your garden and seeing your plants thriving without you having to worry about the temperature, humidity, or watering schedules. By automating your greenhouse with a Raspberry Pi, you can create an environment where your plants can flourish with minimal effort on your part. This guide will walk you through the process of building your own smart greenhouse, step by step.
Key Components and Supplies Needed
Before diving into the build, it’s essential to gather all the necessary components. Here’s what you’ll need:
-
Raspberry Pi: The brain of your operation. A Raspberry Pi 3 or 4 will work perfectly.
-
Sensors: You’ll need sensors to monitor temperature, humidity, soil moisture, and light levels.
-
Actuators: These include fans, pumps, and lights that will be controlled by the Raspberry Pi.
-
Power Supply: Ensure you have a reliable power source for the Raspberry Pi and other components.
-
Wires and Breadboard: For connecting your sensors and actuators to the Raspberry Pi.
-
Software: Python will be used to program the Raspberry Pi.
Advantages of Automating Your Greenhouse
Automating your greenhouse can significantly improve efficiency and productivity. By using a Raspberry Pi to monitor and control various environmental factors, you can ensure optimal growing conditions. For instance, efficient greenhouse irrigation systems can save water and maximize plant growth.
Automating your greenhouse offers numerous benefits:
-
Consistency: Automated systems ensure that your plants receive the same care every day, regardless of external factors.
-
Efficiency: By monitoring and adjusting conditions in real-time, you can optimize resource use, such as water and electricity.
-
Convenience: Remote monitoring allows you to check on your plants from anywhere, reducing the need for constant physical presence.
-
Data-Driven Decisions: Collecting data over time helps you understand the best conditions for your plants and make informed adjustments.
Understanding Automated Greenhouse Monitoring
Why Automate Your Greenhouse?
Automating your greenhouse can significantly enhance plant health. For example, using smart agriculture techniques allows for more precise monitoring and care.
Automating your greenhouse isn’t just about convenience; it’s about creating the perfect environment for your plants to thrive. By using sensors to monitor conditions and actuators to make adjustments, you can ensure that your plants are always in the best possible environment. This leads to healthier plants, higher yields, and less wasted resources.
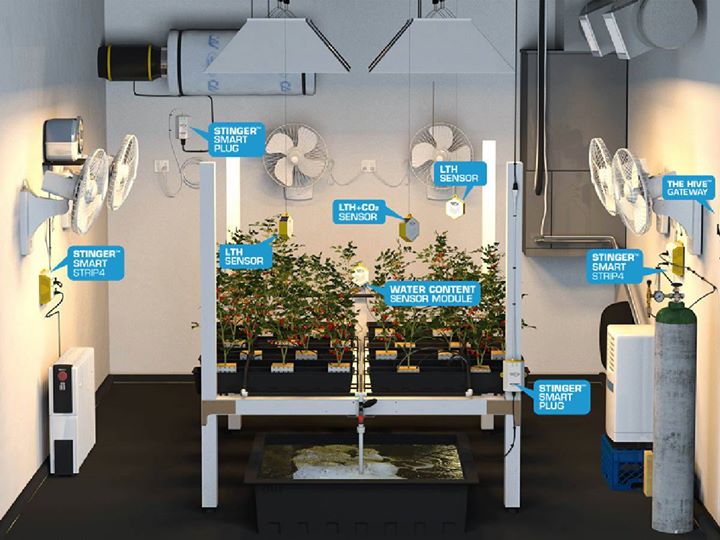
Essential Sensors for Greenhouse Monitoring
To effectively monitor and control your greenhouse, you’ll need a variety of sensors:
-
Temperature Sensors: These help maintain the optimal temperature range for your plants.
-
Humidity Sensors: Essential for controlling moisture levels in the air.
-
Soil Moisture Sensors: Ensure your plants are getting the right amount of water.
-
Light Sensors: Measure the amount of light your plants are receiving, ensuring they get enough for photosynthesis.
Overview of the Raspberry Pi
For those interested in efficient irrigation systems, check out the best automated greenhouse soil moisture control systems.
The Raspberry Pi is a small, affordable computer that can be used for a variety of DIY projects. For our greenhouse, it will act as the central control unit, processing data from the sensors and controlling the actuators. It runs on a Linux-based operating system and can be programmed using Python, making it a versatile and powerful tool for automation.
Setting Up the Raspberry Pi Grow Room Controller
Gathering the Necessary Components
Start by gathering all the components listed earlier. Ensure you have a Raspberry Pi, the necessary sensors, actuators, power supply, and wiring materials. Having everything ready before you begin will make the process smoother and more efficient. For more information on how to use these components, check out this guide on hydroponics and smart sensors.
Wiring and Connecting Sensors
To ensure your greenhouse is functioning optimally, proper wiring and connecting of sensors is crucial. This step involves connecting temperature, humidity, and light sensors to your Raspberry Pi. These sensors help in monitoring and controlling the climate within the greenhouse. For more advanced setups, you can explore using hydroponics and smart sensors to maintain optimal growing conditions.
Next, you’ll need to connect your sensors to the Raspberry Pi. This involves wiring the sensors to the GPIO (General Purpose Input/Output) pins on the Raspberry Pi. Here’s a basic outline:
-
Connect the ground (GND) pin of each sensor to a ground pin on the Raspberry Pi.
-
Connect the power (VCC) pin of each sensor to a 3.3V or 5V pin on the Raspberry Pi, depending on the sensor’s requirements.
-
Connect the data (signal) pin of each sensor to an appropriate GPIO pin on the Raspberry Pi.
For more detailed instructions, check out this Raspberry Pi controlled greenhouse guide.
Setting Up the Software
With the hardware set up, it’s time to install the necessary software on your Raspberry Pi:
-
Install the latest version of Raspbian, the Raspberry Pi’s operating system.
-
Update your system to ensure you have the latest software and security patches.
-
Install Python and any necessary libraries for your sensors and actuators.
Once you have everything installed, you’re ready to start programming your Raspberry Pi to monitor and control your greenhouse.
Step-by-Step Guide to Building the System
Now that you have the basics covered, let’s dive into the step-by-step process of building your automated greenhouse monitoring system.
Creating the Control Box
The control box is the heart of your smart greenhouse system. It houses the Raspberry Pi and all the necessary wiring and components. To create the control box, follow these steps and consider integrating temperature alert systems for enhanced monitoring.
-
Find a suitable enclosure that can protect your Raspberry Pi and other components from dust and moisture.
-
Drill holes in the enclosure for wires to pass through. Ensure the holes are appropriately sized for the wires you are using.
-
Mount the Raspberry Pi inside the enclosure using screws or adhesive mounts.
-
Organize the wiring neatly inside the enclosure, using cable ties to keep everything in place.
-
Label the wires to easily identify each connection when troubleshooting or making adjustments.
Once the control box is assembled, you’re ready to move on to installing the sensors and connecting everything to power. For more detailed instructions, you can refer to this Smart Greenhouse Controlled Using a Raspberry Pi 4 guide.
“Environmental Controllers: Your Grow …” from growace.com
Installing the Sensors
Properly installing the sensors is crucial for accurate monitoring. Here’s how to do it:
-
Temperature and Humidity Sensors: Place these sensors at plant level to get accurate readings of the conditions your plants are experiencing. Avoid placing them near direct sunlight or sources of heat.
-
Soil Moisture Sensors: Insert these sensors into the soil near the roots of your plants. Ensure they are at a consistent depth for accurate moisture readings.
-
Light Sensors: Position these sensors where they can measure the amount of light your plants receive throughout the day. Avoid placing them in shaded areas.
After placing the sensors, connect them to the Raspberry Pi using the wiring instructions provided earlier.
Connecting to Power Sources
Now it’s time to connect your system to power. Follow these steps to ensure everything is powered correctly:
First, connect the power supply to your Raspberry Pi. Ensure you are using a reliable power source that provides the necessary voltage and current for your Raspberry Pi model.
Next, connect the actuators (fans, pumps, lights) to their respective power sources. Ensure the connections are secure and that you are using the correct voltage for each actuator. If necessary, use relays or transistors to control the power to these components from the Raspberry Pi.
Finally, double-check all connections to ensure there are no loose wires or potential short circuits. Once everything is secure, power on the Raspberry Pi and the actuators to test the system.
Programming the Raspberry Pi
With the hardware set up, it’s time to program the Raspberry Pi to monitor and control your greenhouse. This involves writing code to read data from the sensors and control the actuators based on that data.
Introduction to Python Coding for Beginners
If you’re new to programming, don’t worry. Python is a beginner-friendly language, and there are plenty of resources available to help you get started. Here’s a quick introduction to Python:
-
Python is a high-level programming language known for its readability and simplicity.
-
It uses indentation to define code blocks, making it easy to understand the structure of the code.
-
Python has a large standard library and many additional libraries available, making it versatile for various applications.
To begin, install Python on your Raspberry Pi if it’s not already installed. You can do this by running the following command in the terminal:
sudo apt-get install python3
Once Python is installed, you’re ready to start writing your control program.
Writing the Main Control Program
The main control program will read data from the sensors and control the actuators based on that data. Here’s a basic outline of what the program should do:
-
Initialize the sensors and actuators.
-
Read data from the sensors at regular intervals.
-
Analyze the data to determine if any adjustments are needed (e.g., turning on a fan if the temperature is too high).
-
Control the actuators based on the analysis.
-
Log the data for future reference and analysis.
Here’s a simple example of a Python script that reads data from a temperature sensor and controls a fan:
import timeimport Adafruit_DHT

# Sensor and pin configuration
sensor = Adafruit_DHT.DHT22
pin = 4

# Actuator pin
fan_pin = 17

# Setup GPIO
GPIO.setmode(GPIO.BCM)
GPIO.setup(fan_pin, GPIO.OUT)

while True:
    # Read sensor data
    humidity, temperature = Adafruit_DHT.read_retry(sensor, pin)

    if temperature is not None:
        print('Temp={0:0.1f}*C'.format(temperature))

        # Control fan based on temperature
        if temperature > 25:
            GPIO.output(fan_pin, GPIO.HIGH)
        else:
            GPIO.output(fan_pin, GPIO.LOW)

    time.sleep(10)
This script reads the temperature every 10 seconds and turns the fan on if the temperature exceeds 25°C. You can expand this script to include other sensors and actuators as needed. For more advanced climate control, consider using smart sensors for climate control in your greenhouse.
Integrating Sensor Data
To make the most of your automated greenhouse, you’ll want to integrate data from all your sensors. This allows you to create a comprehensive control system that adjusts multiple factors simultaneously. Here’s how to do it:
First, modify your main control program to read data from all the sensors you’ve installed. Store this data in variables for easy access. Next, create logic to analyze the combined data and make decisions based on multiple factors. For example, you might want to turn on a humidifier if the humidity is too low, but only if the temperature is also within a certain range.
Finally, update your actuator control logic to account for the combined data. This might involve turning on multiple actuators at once or adjusting their settings based on the sensor data.
Monitoring and Managing Your Greenhouse
With your automated greenhouse system up and running, it’s time to start monitoring and managing it. This involves accessing the data remotely, using charts for data visualization, and troubleshooting any issues that arise.
Accessing Data Remotely
One of the key benefits of an automated greenhouse is the ability to monitor it remotely. To do this, you’ll need to set up remote access to your Raspberry Pi. There are several ways to do this:
-
SSH: Secure Shell (SSH) allows you to access the Raspberry Pi’s terminal from another computer. This is useful for checking logs and making adjustments to the control program.
-
Web Interface: Create a simple web interface that displays sensor data and allows you to control actuators. This can be done using a web framework like Flask or Django.
-
Mobile App: Develop a mobile app that connects to your Raspberry Pi and provides real-time data and control options.
Whichever method you choose, ensure that your connection is secure to prevent unauthorized access to your system.
Using Charts for Data Visualization
Visualizing your sensor data can help you understand trends and make informed decisions about your greenhouse. There are several tools you can use to create charts and graphs, such as those used in smart sensors for climate control.
-
Matplotlib: A Python library for creating static, interactive, and animated visualizations.
-
Plotly: A graphing library that makes interactive, publication-quality graphs online.
-
Grafana: An open-source platform for monitoring and observability, which can create complex dashboards with real-time data.
By regularly reviewing these visualizations, you can identify patterns and optimize your greenhouse conditions for maximum plant health and growth.
Troubleshooting Common Issues
Even with the best setup, you may encounter issues with your automated greenhouse system. Here are some common problems and how to troubleshoot them, including tips on efficient greenhouse irrigation.
-
Sensor Failures: If a sensor stops working, check the wiring and connections. Ensure the sensor is receiving power and that the data pin is connected correctly.
-
Actuator Malfunctions: If an actuator isn’t responding, verify that it’s receiving power and that the control signal from the Raspberry Pi is correct. Check for any physical obstructions or damage.
-
Software Errors: If your control program isn’t running as expected, review the code for errors. Use print statements or logging to identify where the program is failing.
By systematically troubleshooting these issues, you can quickly identify and resolve problems, ensuring your greenhouse remains fully operational.
Maintaining and Enhancing the System
Once your automated greenhouse system is up and running, regular maintenance and occasional upgrades will keep it functioning optimally. Additionally, you can enhance the system by adding new features and capabilities.
Routine System Checks
Perform routine checks to ensure everything is working correctly:
-
Inspect sensors and actuators for signs of wear or damage.
-
Check wiring connections to ensure they are secure and free from corrosion.
-
Review the control program logs for any errors or anomalies.
-
Test the system periodically to ensure it responds correctly to changes in sensor data.
By performing these checks regularly, you can catch potential issues early and prevent system failures.
Routine System Checks
Perform routine checks to ensure everything is working correctly. For more detailed guidance, you can refer to this guide on using hydroponics and smart sensors for climate control in your greenhouse.
-
Inspect sensors and actuators for signs of wear or damage.
-
Check wiring connections to ensure they are secure and free from corrosion.
-
Review the control program logs for any errors or anomalies.
-
Test the system periodically to ensure it responds correctly to changes in sensor data.
By performing these checks regularly, you can catch potential issues early and prevent system failures. For more tips on maintaining your greenhouse, check out our greenhouse glazing replacement guide.
Upgrading Sensors and Components
-
Replace outdated sensors with newer, more accurate models.
-
Upgrade the Raspberry Pi to a more powerful model if needed.
-
Add additional sensors to monitor more environmental factors.
-
Install more efficient actuators to improve system performance.
Upgrading your sensors and components can significantly enhance the performance of your automated greenhouse system. Newer sensors often provide more accurate and reliable data, which can lead to better decision-making and improved plant health. For more details on how to set up a Raspberry Pi controlled greenhouse, check out this comprehensive guide.
For instance, if you started with a basic temperature sensor, consider upgrading to a combined temperature and humidity sensor for more comprehensive data. Similarly, upgrading your actuators to more efficient models can reduce energy consumption and improve system responsiveness.
Besides that, adding additional sensors can provide a more detailed picture of your greenhouse environment. For example, installing CO2 sensors can help you monitor and adjust carbon dioxide levels, which are crucial for plant growth.
Expanding System Capabilities
As you become more comfortable with your automated greenhouse system, you might want to expand its capabilities. Here are a few ideas:
-
Integrate a weather station to adjust greenhouse conditions based on external weather data.
-
Add a camera system to visually monitor plant growth and health remotely.
-
Implement machine learning algorithms to predict and optimize growing conditions.
-
Connect the system to smart home devices for seamless integration and control.
Integrating a weather station can provide valuable data on external conditions, allowing your system to make more informed adjustments. For example, if a storm is approaching, the system can preemptively adjust humidity and temperature settings to protect your plants.
Adding a camera system allows you to visually monitor your plants’ health and growth without being physically present. This can be particularly useful for identifying issues such as pests or diseases early on.
Implementing machine learning algorithms can take your automated greenhouse to the next level. By analyzing historical data, these algorithms can predict optimal growing conditions and make real-time adjustments to maximize plant health and yield.
Benefits and Potential Challenges
Automating your greenhouse offers numerous benefits, but it also comes with potential challenges. Understanding both can help you make the most of your system and address any issues that arise.
Increased Efficiency and Yield
One of the most significant benefits of an automated greenhouse is increased efficiency. By continuously monitoring and adjusting conditions, your plants receive the optimal care they need to thrive. This can lead to higher yields and better-quality produce.
Potential Technical Issues
However, automation also introduces potential technical issues. Sensors and actuators can fail, software bugs can cause unexpected behavior, and network issues can disrupt remote monitoring. Regular maintenance and troubleshooting are essential to keep your system running smoothly.
Cost vs. Long-term Benefits
Setting up an automated greenhouse involves an initial investment in hardware and time. However, the long-term benefits often outweigh these costs. By optimizing resource use and increasing yields, you can save money and effort in the long run. Additionally, the data collected by your system can provide valuable insights for future improvements.
Overall, the combination of increased efficiency, higher yields, and valuable data makes automating your greenhouse a worthwhile investment. For more details, check out our guide on maximizing greenhouse crop yields.
In summary, while there are challenges associated with automating your greenhouse, the benefits far outweigh the drawbacks. By carefully planning and maintaining your system, you can create an optimal environment for your plants and enjoy the rewards of a thriving garden.
Frequently Asked Questions (FAQ)
Here are some common questions and answers about setting up and maintaining an automated greenhouse using a Raspberry Pi.
What is the cost of the DIY project?
The cost of setting up an automated greenhouse can vary depending on the components you choose. On average, you can expect to spend around $100-$200 for a basic setup, including the Raspberry Pi, sensors, actuators, and wiring. Additional costs may arise if you choose to upgrade components or add new features.
How durable is the Raspberry Pi system?
The Raspberry Pi is a robust and reliable platform for automation projects. With proper care and maintenance, it can run continuously for years. Ensure that the Raspberry Pi and other components are housed in a protective enclosure to shield them from dust, moisture, and physical damage. For more information, check out this Raspberry Pi IoT project guide.
Regularly check the system for signs of wear or damage and replace any faulty components promptly to maintain reliability.
Can I use other sensors besides the ones mentioned?
Yes, you can use a variety of sensors to monitor different environmental factors in your greenhouse. The Raspberry Pi is compatible with many types of sensors, including CO2 sensors, pH sensors, and light intensity sensors. Choose sensors that are suitable for your specific needs and integrate them into your system.
What if I have no coding experience?
If you have no coding experience, don’t worry. Python is a beginner-friendly language, and there are many online resources and tutorials available to help you get started. You can find example code and libraries for common sensors and actuators, making it easier to write your control program.
Additionally, online communities and forums can provide support and guidance as you build and refine your automated greenhouse system.
How do I access the system remotely?
There are several ways to access your automated greenhouse system remotely:
-
SSH: Use Secure Shell (SSH) to access the Raspberry Pi’s terminal from another computer.
-
Web Interface: Create a web interface using a framework like Flask or Django to display sensor data and control actuators.
-
Mobile App: Develop a mobile app that connects to your Raspberry Pi for real-time monitoring and control.
Ensure that your remote access method is secure to protect your system from unauthorized access. For more detailed guidance, check out this Raspberry Pi IoT project.
By following these steps, you can create a powerful and reliable automated greenhouse system that helps your plants thrive while reducing the effort required to maintain optimal conditions.