Key Takeaways
-
A rainwater harvesting system can save you money and reduce your ecological footprint.
-
You’ll need basic tools and materials like barrels, gutters, and downspouts to get started.
-
Choosing the right size and type of storage container is crucial for efficiency.
-
Regular maintenance is necessary to keep your system clean and functioning.
-
With the right setup, rainwater can be used for irrigation, benefiting your plants and the environment.
Harvest the Sky: Simple Steps to Set Up Your Greenhouse Rainwater System
Why let rainwater go to waste when it can be the cornerstone of your greenhouse’s ecosystem? Collecting rainwater is a game-changer. It’s naturally soft, devoid of chlorine and fluoride, and just what your plants have been craving. Most importantly, it’s free and reduces your reliance on municipal water. That’s a win for both your wallet and the planet.
The Why: Perks of Rainwater for Your Greenhouse
Here’s the deal: rainwater is often better for your plants than tap water. It’s soft water, which means it’s free from the salts, minerals, and chemicals that can accumulate in the soil over time, potentially harming plant roots and microorganisms. Plus, it’s at the perfect pH level for most plants. Besides that, harvesting rainwater reduces your environmental footprint by decreasing demand on water treatment facilities and supply systems.
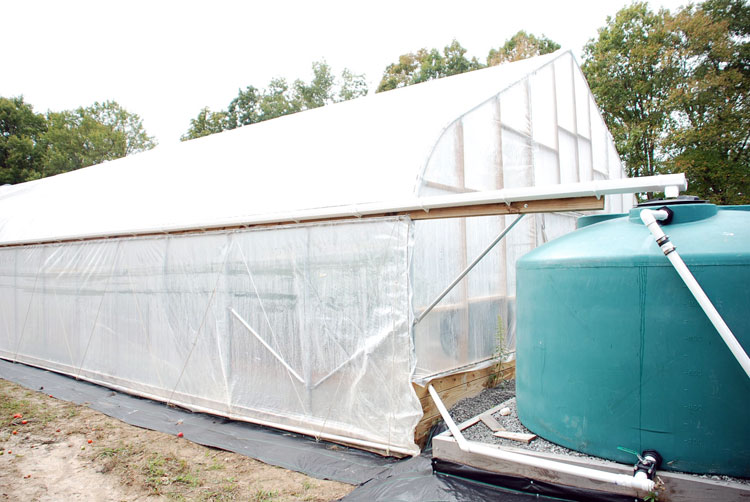
“GREENHOUSES -” from pegwaenterprises.com
Tools of the Trade: What You’ll Need
Getting your hands dirty with a DIY rainwater harvesting system doesn’t require a Ph.D. in engineering. You’ll need some common tools and materials, most of which you can find at your local hardware store or repurpose from items you already have at home. Here’s what you should gather: For a more comprehensive list, check out this Beginner’s Guide to Rainwater Harvesting.
-
A rain barrel or large storage tank
-
Gutters and downspouts
-
PVC pipes or flexible tubing
-
A hacksaw for cutting pipes
-
A drill for making holes
-
Mesh screens to keep out debris and mosquitoes
-
Waterproof sealant
-
Supports or stands for elevating your barrel or tank
Gather Your Gear: Choosing the Right Materials
Now, let’s talk specifics. The heart of your system is the storage container. It can be a repurposed barrel or a sleek new tank designed specifically for rainwater collection. Here’s what you need to know:
Storage Solutions: Tanks vs. Barrels
When it comes to choosing your storage solution, size does matter. A larger tank will hold more water, but it’ll also take up more space. Here’s a quick comparison:
|
Barrels |
Tanks |
|---|---|
|
Usually smaller, around 50-80 gallons |
Can range from 100 to thousands of gallons |
|
More suitable for small-scale gardens |
Better for larger operations or if you live in a rainier climate |
|
Can be linked together to increase capacity |
May require a more permanent setup |
Remember, the size of your container should match your greenhouse’s watering needs and the amount of rainfall your area receives. For more detailed information, check out our guide on year-round greenhouse gardening.
Gutters and Downspouts: The Collection Network
Your gutters and downspouts are like the veins of your rainwater harvesting system. They channel water from your greenhouse roof right into your storage container. You’ll want to make sure they’re wide enough to handle heavy downpours and positioned to capture as much water as possible.
Channeling the Rain: Downspouts and Diverter Insights
Let’s talk about getting that precious rain from your roof to your barrel. It’s all about directing the flow efficiently and keeping out the debris that could clog up your system. That’s where downspouts and diverters come into play. Think of them as the conductors of an orchestra, making sure every drop of rain hits the right note.
Connecting Gutters to Barrels: A Step-by-Step Guide
First, make sure your gutters are clean. Any leaves or sticks up there? Get ’em out. Next, attach your downspout to the gutter’s outlet. The downspout should lead straight to your rain barrel. If it doesn’t, you might need to use some elbows or a flexible downspout extension to guide the water directly into your barrel.
Here’s the drill (quite literally):
-
Position your rain barrel where you want it.
-
Measure and cut the downspout to fit the distance between the gutter and the barrel.
-
Attach an elbow to the bottom of the cut downspout if needed to direct water into the barrel.
-
Secure the downspout with brackets to ensure stability.
-
Use a drill to create a hole in the lid of the barrel for the downspout, if it’s not already pre-fitted.
-
Place a mesh screen over the opening to keep out debris and insects.
Installing Diverters: Keeping Out Debris
Now, about those diverters. They’re the unsung heroes that keep leaves and twigs from throwing a party in your rain barrel. Install a diverter on the downspout above the barrel. When it rains, the diverter will channel water into your barrel while the leaves and debris continue down the downspout, away from your clean water supply.
And here’s a little trick: if you install the diverter with a slight downward angle towards the barrel, gravity will give you a hand, making your system even more efficient.
Remember, the goal is to keep your water as clean as possible from the start. This means less work for you later on and more time enjoying your lush greenhouse.
Water Storage Wisdom: Setting Up Your Barrel or Tank
With the rain successfully directed into your barrel, let’s make sure it’s set up for success. The position of your barrel is key. You’ll want it elevated so gravity can do the work when it’s time to water your plants. Just a couple of feet off the ground should do the trick. This way, you’ll have enough pressure to fill a watering can or even attach a hose. For more detailed guidance, check out our DIY rooftop garden layouts which can be adapted for greenhouse rainwater harvesting systems.
Elevating for Gravity: Improving Water Pressure
Use cinder blocks, a sturdy stand, or even build a custom platform to raise your barrel. Make sure whatever you choose can support the weight of a full barrel – water’s heavy, about 8.34 pounds per gallon. So, a 55-gallon barrel can weigh over 450 pounds when full!
Overflow: Planning for Excess Water
What happens when your barrel fills up, and it’s still raining? You’ll need an overflow system. Attach an overflow hose to the top of your barrel, leading the excess water away from your greenhouse foundation. You can direct it to another barrel, a flower bed, or a rain garden.
Keeping it Clean: Screens and Filters
Even with diverters, some debris might make its way into your barrel. Place a fine mesh screen over the top to catch the little bits. And consider adding a first-flush diverter, which ensures the initial dirty water from your roof doesn’t enter your barrel at all.
The Flow of Water: Setting Up Irrigation from Your Rain Barrel
Now, let’s get that water to your plants. A simple gravity-fed irrigation system can work wonders. You can use a hose for spot watering or set up a DIY drip irrigation system for a more hands-off approach.
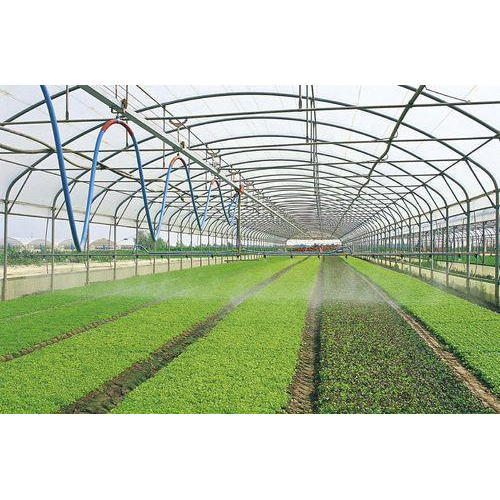
“better irrigation systems …” from mazeros.com
DIY Drip Irrigation: A Simple How-To
Here’s a quick guide to setting up a basic drip system:
-
Attach a garden hose to the spigot on your rain barrel.
-
Run the hose to your plant beds or pots.
-
Puncture small holes in the hose where you want water to drip out, or use a soaker hose that’s designed for this purpose.
-
Regulate the flow with a hose valve or by adjusting the spigot on the barrel.
This setup will keep your plants hydrated without overwatering them, and it’s incredibly water-efficient.
Hose Attachments: Making Your System User-Friendly
For a more user-friendly system, add quick-connect hose fittings. These let you switch between different hose attachments quickly and without any fuss. You can go from a soaker hose in your vegetable garden to a spray nozzle for your pots in no time.
Quality Control: Treating Your Harvested Rainwater
While rainwater is great for plants, you might want to think twice before using it for anything else. If you plan to use rainwater for washing or, with proper treatment, even drinking, you’ll need to purify it first.
When to Treat: Uses for Your Collected Rain
Here’s the deal: for garden use, untreated rainwater is usually fine. But if you’re using it for anything that might involve human consumption, it needs to be treated. This can be as simple as a DIY sand filter or as complex as a UV purification system, depending on your needs.
Simple Filtration Methods
If you’re considering using rainwater for more than just irrigation, simple filtration methods can be applied to ensure safety and cleanliness. For non-potable uses like washing or flushing toilets, a basic sediment filter will remove particles from the water. But if you’re thinking about potable uses, you’ll need to add a step or two.
For drinking water, a multi-barrier approach is best. Start with a sediment filter to remove particles. Follow this with a carbon filter to eliminate odors and improve taste. Finally, use a UV light filter to kill any bacteria or viruses. This combination can turn rainwater into safe drinking water.
Regular Maintenance: Ensuring Longevity and Performance
Maintenance is the secret to a long-lasting rainwater harvesting system. A little bit of care goes a long way in preventing blockages, maintaining water quality, and ensuring the system works smoothly year-round. For more in-depth information, check out our comprehensive greenhouse growing guide for beginners.
Cleaning Protocols
Here’s what you should do to keep your system in tip-top shape:
-
Inspect and clean your gutters and downspouts regularly to prevent blockages.
-
Empty and scrub your rain barrel at least once a year to remove sediment and algae.
-
Check your screens and filters every few months and clean or replace them as needed.
Remember, a clean system is an efficient system. It’s worth the effort to keep everything running smoothly.
Winterize Your System: Protection from the Cold
When the cold months roll in, it’s time to winterize your system to prevent damage from freezing temperatures. Drain all the water from your barrels, gutters, and pipes. If possible, store your barrel inside to protect it from the elements. Finally, cover your gutters and downspouts to prevent them from filling with ice and snow.
Optimizing Rain Harvesting: Advanced Tips for Efficiency
To truly maximize your rainwater harvesting system’s potential, you can incorporate a few advanced techniques. These tweaks can increase your catchment efficiency and ensure you get the most out of every rainfall.
Calculating Catchment: How Much Water Can You Collect?
Understanding your catchment potential is key. Here’s a simple formula: for every inch of rain that falls on a 1,000 square foot surface, you can collect approximately 600 gallons of water. Measure your greenhouse roof area and use local rainfall data to estimate how much water you could collect annually.
Smart System Additions: First Flush Diverters and More
Consider adding a first flush diverter to improve water quality. This device ensures the first bit of water – which carries most of the debris and contaminants from your roof – is diverted away from your storage. Also, think about installing a rainwater pillow under your greenhouse if you’re short on space. These large, flat bladders can store a significant amount of water without taking up valuable real estate.
Example: A first flush diverter can be made from a simple length of PVC pipe with a ball valve at the bottom. When it rains, the water fills the pipe, and the debris settles at the bottom. Once the pipe is full, cleaner water flows over into your storage tank.
Frequently Asked Questions (FAQ)
Is Rainwater Harvesting Legal Everywhere?
Most places encourage rainwater harvesting, but local laws vary. Some areas may have restrictions on how you collect or use rainwater, so it’s essential to check with your local government before setting up your system.
How Can I Prevent Mosquitoes in My Rain Barrel?
Mosquitoes can be a nuisance, but they’re easy to thwart. Always cover openings with a tight-fitting, fine mesh screen to prevent them from getting in and laying eggs. Also, consider adding a few drops of oil to the water’s surface to create a film that deters mosquitoes.
Can I Drink the Water from My Rainwater Harvesting System?
With proper filtration and purification – including sediment, carbon, and UV filters – rainwater can be made safe for drinking. However, it’s crucial to regularly maintain and test your system to ensure water quality.
How Often Should I Clean My Rainwater Collection System?
Clean your gutters and screens at least twice a year, and give your storage tank a thorough clean once a year. Regular inspections will help you spot and fix any issues before they become problems.